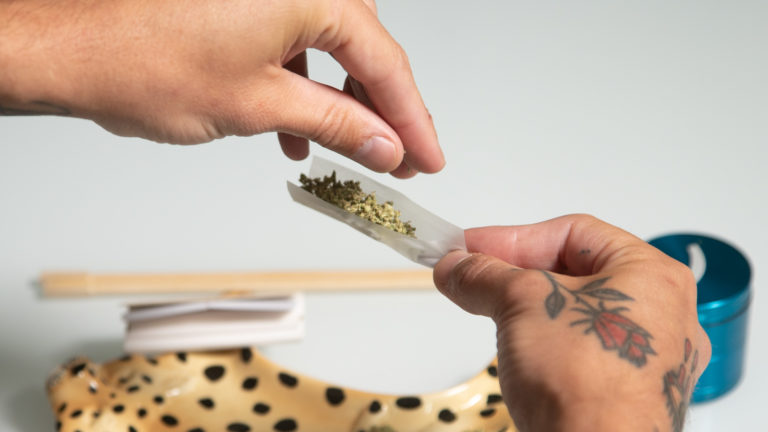
Smoking joints is one of the most popular ways to consume cannabis. Passing a joint is part of the social aspect of cannabis consumption and learning to roll the old school way is a cultural initiation for many. Rolling a joint can be a highly personal, intricate craft, but with a few simple steps, any new toker can roll their very own. Read on to learn about the art of rolling a joint.
What is a joint?
A joint is a cannabis cigarette that’s often hand-rolled by an individual. Some dispensaries offer prerolls, or joints rolled in-shop, for consumers to purchase, saving a few steps. A cannabis joint that includes both cannabis and tobacco is called a spliff, while a cigar hollowed out and filled with cannabis is a blunt. Blunts can also be made by rolling cannabis in the kind of heavy, dark, tobacco papers used for cigars.

What you need to roll a joint
To roll a cannabis joint, you’ll need to assemble a handful of essential materials:
- Cannabis, usually about a third of a gram per joint
- Grinder
- Rolling tray
- Rolling papers (more below)
- Filter or crutch, or material to make one (more below)
- Chopstick, pen, or similarly shaped item

How to roll a joint
Step 1: Grind the cannabis
Use a grinder to separate and evenly grind up the flower. A grinder produces a consistent size and texture, which provides a smoother, more even smoke. If you don’t have a grinder, pick the bud apart with your fingers. Work gently to minimize damage to the cannabis trichomes as you remove any stems or seeds and make the pieces more or less the same small size.

Step 2: Make a crutch
Many smoke shops sell pre-made crutches to serve as the mouthpiece of a joint. While crutches aren’t essential, they help reinforce the mouthpiece and make a joint easier to hold. Crutches also boost the airflow through a joint and minimize the risk of burning your lips or inhaling tiny bits of marijuana during a hit.

To make a crutch, grab a piece of thick paper or cardstock and rip off a rectangle-shaped strip about half an inch wide (¾ inch if you’re using king-size papers). Fold most of the paper into an accordion shape then wrap the last bit of paper around the accordion part. Business cards actually work great for making crutches. Glass and wooden crutches are great alternatives to paper and can be found at tobacco shops, head shops and some dispensaries.
Crutches are also called filters or tips. Some people call them roaches but a roach is actually the last little charred bit of a smoked joint.
Step 3: Load the joint
Lay the rolling paper on the tray with the adhesive side away from you. Position the crutch where you want the mouthpiece to be and sprinkle marijuana onto the paper in a column in line with the crutch. Evenly spread the flower throughout the joint and avoid overstuffing it.

To roll a cone joint, sprinkle less weed near the mouthpiece and more towards the tip, tapering as you move.
Step 4: Roll the joint
It’s finally time to get rolling. Be sure the adhesive-coated side of the paper is away from you and pick up the cannabis-filled paper. Use your thumbs and index fingers to pinch the paper into a taco shape, sifting the paper back and forth to distribute the bud evenly and pack it down a bit. It’s okay if some flower falls out — you can stuff it in later. Work the weed into a cylinder shape, not so loose that it will burn unevenly and not so tight that it will restrict airflow.

Tuck the non-adhesive side of the rolling paper over the weed and slowly roll it towards the adhesive side, tucking in the bud as you go. Use your thumbs to roll and your index fingers to support the outside. Lick or wet the sticky adhesive and start at the mouthpiece end to slowly seal the joint.

Once it’s sealed, grab a chopstick, pen, or another long, cylindrical object to pack down the cannabis towards the mouthpiece. This is where you can add back any weed lost during the rolling phase.

Step 5: Seal the deal
Twist the extra paper at the tip of the joint to seal everything shut.

Finally, it’s time to spark up your joint and inhale through the mouthpiece. Enjoy!

How to choose rolling papers
Most rolling papers are made of fibers extracted from non-wood sources such as flax, hemp, sisal, rice straw, esparto (a tough grass), and others. Which type of rolling paper makes the perfect joint is really a matter of personal preference. Cannabis smokers who regularly smoke joints and spliffs tend to have their own preferred rolling paper. Preferences might be influenced by how easy a smoker feels it is to work with a certain type of paper when rolling, the flavor of the smoke, how well a smoker feels a certain type of paper burns or other subjective variables.
Many cannabis consumers enjoy using hemp rolling papers in particular, as this makes the entire joint a cannabis-derived product. Moving beyond rolling papers altogether, some cannabis smokers like using cigarillo wraps — made out of tobacco leaves — to roll and smoke blunts.
When it comes to choosing the right material for your joint paper, it’s a balancing act. Ideally, you’d want the thinnest paper possible so the killer strain you’ve chosen shines through. But if you’re learning to roll, an ultrathin paper isn’t the best choice. So, in the beginning, opt for a hemp paper that’s easy to work with. From there, you can move on to thinner rice papers that deliver a smooth, slow-burning smoke. Ultra-thins are the pinnacle of clean smoking papers but they tear up in the hands of amateurs.
Flavored paper is yet another option. Just be sure it pairs well with your chosen strain and isn’t full of chemicals.
In addition to different materials, rolling papers come in different sizes. Here are the most common:
- Single wide — the joint version of a table for one
- 1¼-inch — a popular size, makes a joint for up to a trio of smokers
- 1½-inch — larger than a regular cigarette, seats a party of four
- Double wide — not that popular, high paper-to-weed ratio
- King — bigger and longer burning, handles a party of five easily
- King slim — as long as a King, as wide as a 1¼-inch, best left to experienced rollers
You could also make it really simple on yourself and just buy some cone rolling papers — pre-rolled cone-shaped papers — filter and all — ready for you to drop in some bud, twist the end to seal, and fire it up.
Tips for easier joint-rolling
- Choose the right paper size. While it might be tempting to start with king-size because that sounds easy to handle, it’s actually a bit much. Single-wide is the same problem on the opposite end of the spectrum. Most experts recommend starting with 1¼-inch paper until you’re comfortable.
- Think thick. Joint rolling aficionados can choose any paper they want and roll the perfect doobie. But when you’re just starting out, go for a thicker paper. Hemp is an excellent option. After some practice, you can move on to something so thin it’s nearly invisible.
- Start at the crutch. Hold the filter end tightly between your index finger and thumb. This gives the whole thing stability, gets your hand in the right position, and provides a good starting point to wrap around.
- Slow your roll. Before you roll, take a moment to look at the row of cannabis in the paper. Is it evenly spread? Did you rock the paper back and forth to pack it together a bit? If not, take a moment to adjust before you begin to roll.
- Don’t commit too soon. You don’t have to lick and seal immediately after you roll. If you’ve rolled and the joint isn’t to your liking, unroll and try again. Even if you waste the paper and need another one, that’s better than having the whole thing come apart while you’re smoking or passing it.
- Lick lightly. When you’re ready to seal your joint, there’s no need to slobber all over the thing or, heaven forbid, put the entire joint in your mouth. Just a little moisture along the glue strip will seal up the joint just fine.
- Twist and push. Once you’ve packed your joint with cannabis and rolled it up tightly, give the paper at the open end a little twist and gentle push. This will seal in the bud and make sure it’s packed right to light nicely when you spark it up.
- Practice. Like anything, it takes a little practice to learn to roll the perfect joint. Don’t be afraid to sit down with a few papers and roll until it feels more natural. Maybe try it a bit on your own before offering to roll for a crowd. Have some patience and you’ll be making joint art in no time.

